So, starting today, I’m going to be bringing you some tips about Photoshop Elements I hope will be useful. If there’s something in particular you’d like to know how to do, by all means leave a comment and I’ll try to work it into a future post. Some of my tips will be very elementary, for beginners, and others will be for more advanced users. If you’d like to know more about using Elements, you can catch my Intro to PSE, PSE 201, and Digi Scrapping 101 classes, offered about once a month. The next ones are on September 21 & 22; get the details here.
Today I’m going to talk about the Organizer in PSE. It’s a powerful tool for finding the photos or digital elements you’re looking for, and here’s how it works:
The Organizer does not store separate copies of your photos; rather, you tell it where to look for new images (File>Watch Folders), and it shows you the images you have on your hard drive (or to any external drive you might have told it to watch). It’s like a window; a porthole to your hard drive, if you will.
The best thing about the Organizer, in my opinion, is the ability to tag your images. It comes with default categories like People, Places, etc. Under people, for instance, you could create a tag for each of your children, or other family members. Go the the category you’d like the new sub-category to be under, then choose the green plus sign, to down to “new sub-category,” click, and name the new tag.

PSE Organizer-- new subcatagory under People
Now you’re ready to tag your photos. Simply select all the photos that have the subject in them (SHIFT-click if they are sequential, CTRL-click if they’re not), then drag the relevant tag over to one of the selected images; the tag will attach to all of them. You can attach multiple tags to one image, so it can be labelled “Sophie” AND “Madeline” AND “Baxter,” if all three of my kids are in the photo.

Selecting images to tag
Once you’ve tagged all your images (I know, that could take a while!), you can bring up all the photos with the same tag. Just click on the tag on the right, and you’ll see only images with that tag. I use this feature extensively with my digital scrapbook elements, to help me find the paper or embellishment that’s right for my layout. It’s a little like being able to cross-reference your paper, stickers, flowers & brads by color, AND manufacturer, AND theme.
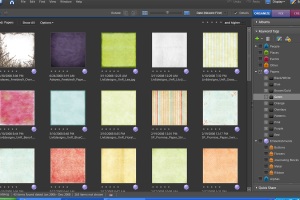
- All images tagged Paper

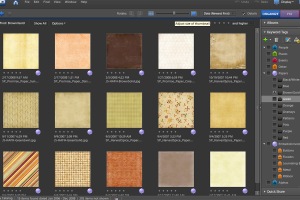
- All images tagged Paper, Brown

While we’re at it, do you see that little slider bar at the top, marked “adjust size of thumbnail,” between Rotate and the pull-down for how images are sorted? (click on the photo for a larger view) If you slide it right you get fewer images on your screen, effectively zooming in. If you slide to the left, you can see more, smaller images.
Tags: Digital Scrapbook Classes, Organizer, Photoshop Elements

September 1, 2008 at 6:32 pm |
These are some great photoshop tips. I never quite know what I’m doing in that program is great to ready how others are accomplishing tasks.
Thanks alot!
December 8, 2008 at 10:30 am |
Hi, I just got PSE and I am so green, I am not quite sure where to begin… Should I get a book for Dummies? I would be happy to take a class somewhere if you knew of one.Tutorials, suggestions, help? Thanks so much